Wine Bottle Planter Tutorial
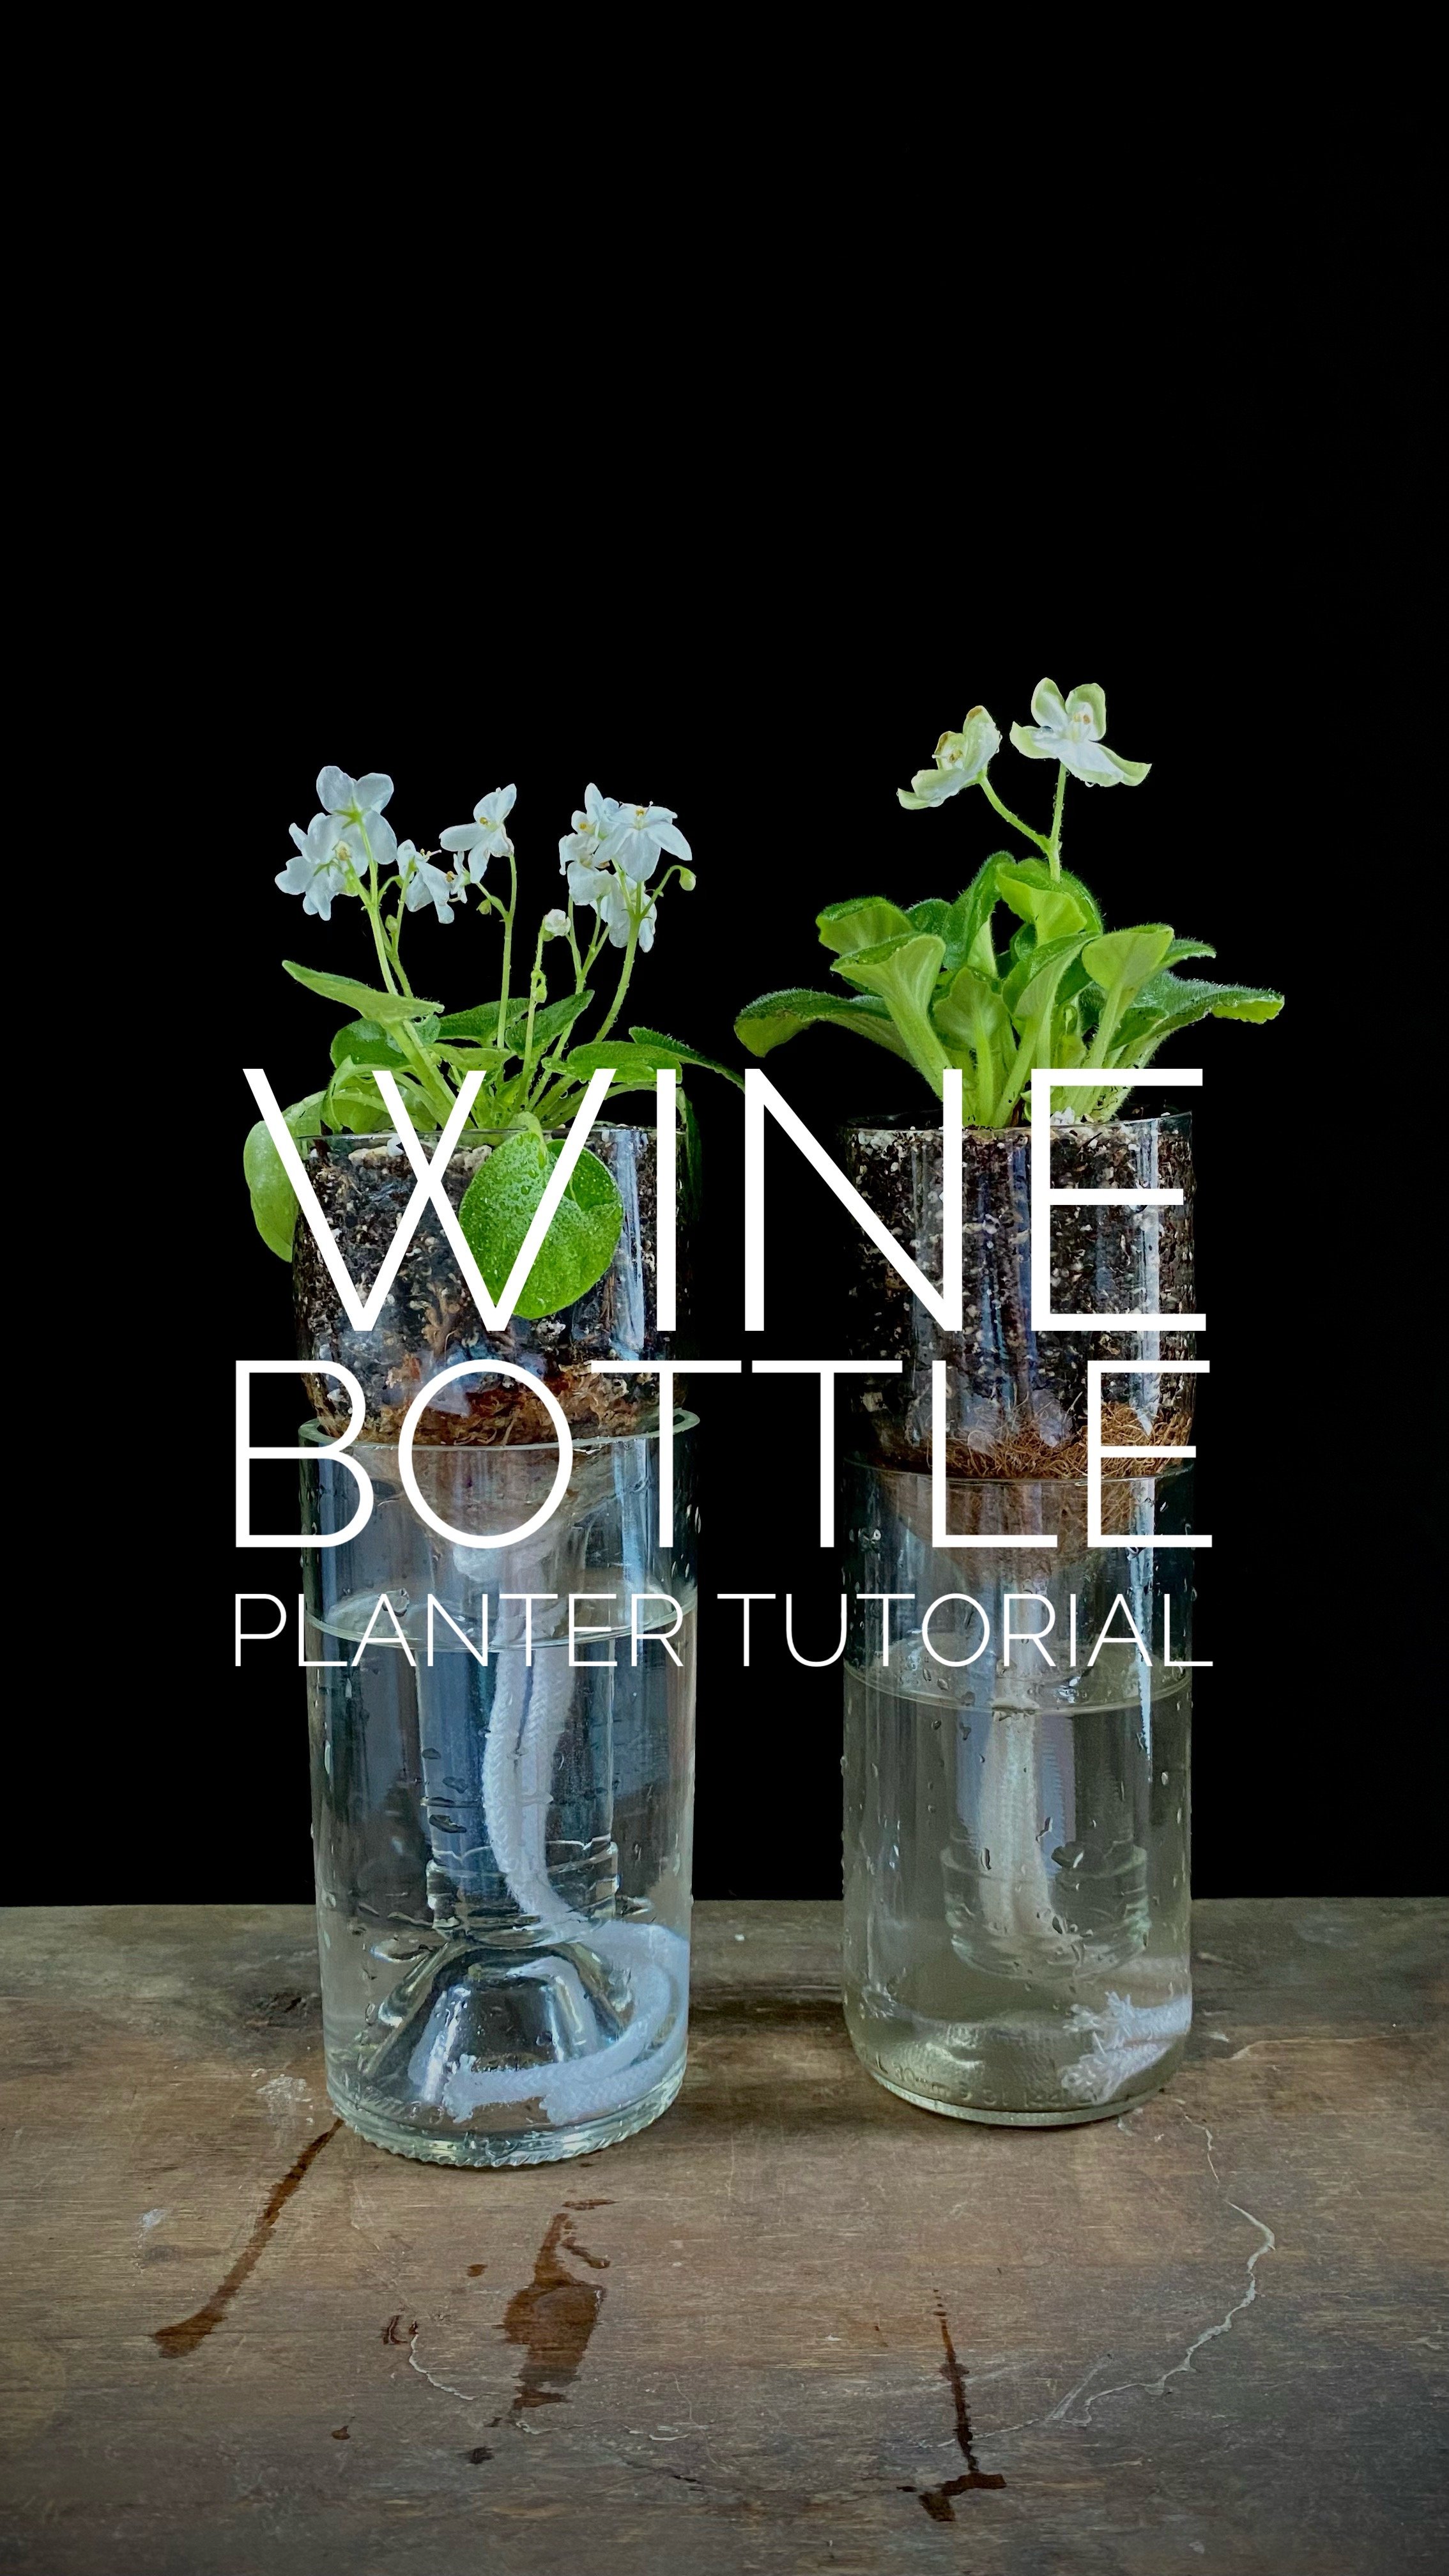
I’ve talked a lot about my up-cycled DYI self-watering wine bottle planters on Plant Daddy Podcast, and shown a lot of plants growing in them on Instagram, so I put together a video tutorial showing how I make these! Scroll down to see that video, and then I’ll go over the process in detail, with some notes that I think might be useful to know.
The steps to cut glass bottles are fairly simple, and the tools and supplies for this project are easy to find - some of them you likely already own.
Supplies
Glass Bottles - I prefer clear glass with a high, rounded shoulder. This will maximize the volume of substrate you can use in the planter.
I have found that not all bottles cut easily - thicker glass is more reliable than thin, but my success rate cutting bottles is about 50%, so I set aside more bottles than I think I will need.Glass Bottle Cutter Kit - these are available in craft stores and online, and while my model is no longer made, the idea is the same with most of these.
A Heat Source - I like using a kitchen torch, but a candle would also work, too.
Sandpaper - I’ve used just any sort of sandpaper I have on hand, but recommend a coarse one, and it also helps if it’s a waterproof sandpaper.
1/4” Cotton Wicking Cord - there are many diameters of this, but I prefer this thickness after trying multiple options. Some people prefer synthetic wicking cords made of nylon, but I have never had issues with mold or rotting using cotton.
Sphagnum Moss or Coconut Fiber Sheet - this is the base layer of the planter that holds the substrate in place. Other materials could work, but these are what I use.
Potting Substrate - this will depend on the type of plant you are using, but it should be slightly more light, airy, and fluffy than you’d use for the same plant in a pot. Since this planting method provides consistent even moisture, this helps keep the roots healthy and happy. I’ve even used pure sphagnum moss or coconut husk chunks with this method for some plants, and it works great.
A Plant - pick a small one that likes consistent, even moisture. I use this method both for plants that mature to small sizes and can live in this setup longterm, as well as young plants that I want to grow up a bit before transitioning them to a typical potted treatment when they are a little less sensitive. A lot of my Hoya starts begin this way!
Optional Items
Goo Gone - this is a great way to clean off stubborn glue from the bottle labels. You can also just use elbow grease and vegetable oil!
Safety note: I have done this a bunch of times, and am familiar with how glass behaves as a material. I don’t wear gloves during this process because I have never had it produce unsafe shards of glass, and I prefer not having my dexterity limited, but make the call that’s right for you, and be careful since we’re literally working with broken glass here! Eye protection is recommended, and because breathing in glass dust can cause serious lung problems longterm, I recommend wearing a mask while sanding the sharp edges, or consider using a wet/dry sandpaper and sanding under water, or with the paper and glass wet enough that you’re creating a glass paste rather than dust. Use your common sense, and be safe!
Process
Step 1. Bottle Prep
Soaking them in warm water to loosen the labels, then remove them, and scrub off any remaining glue.
Step 2. Set your glass cutter to the appropriate position
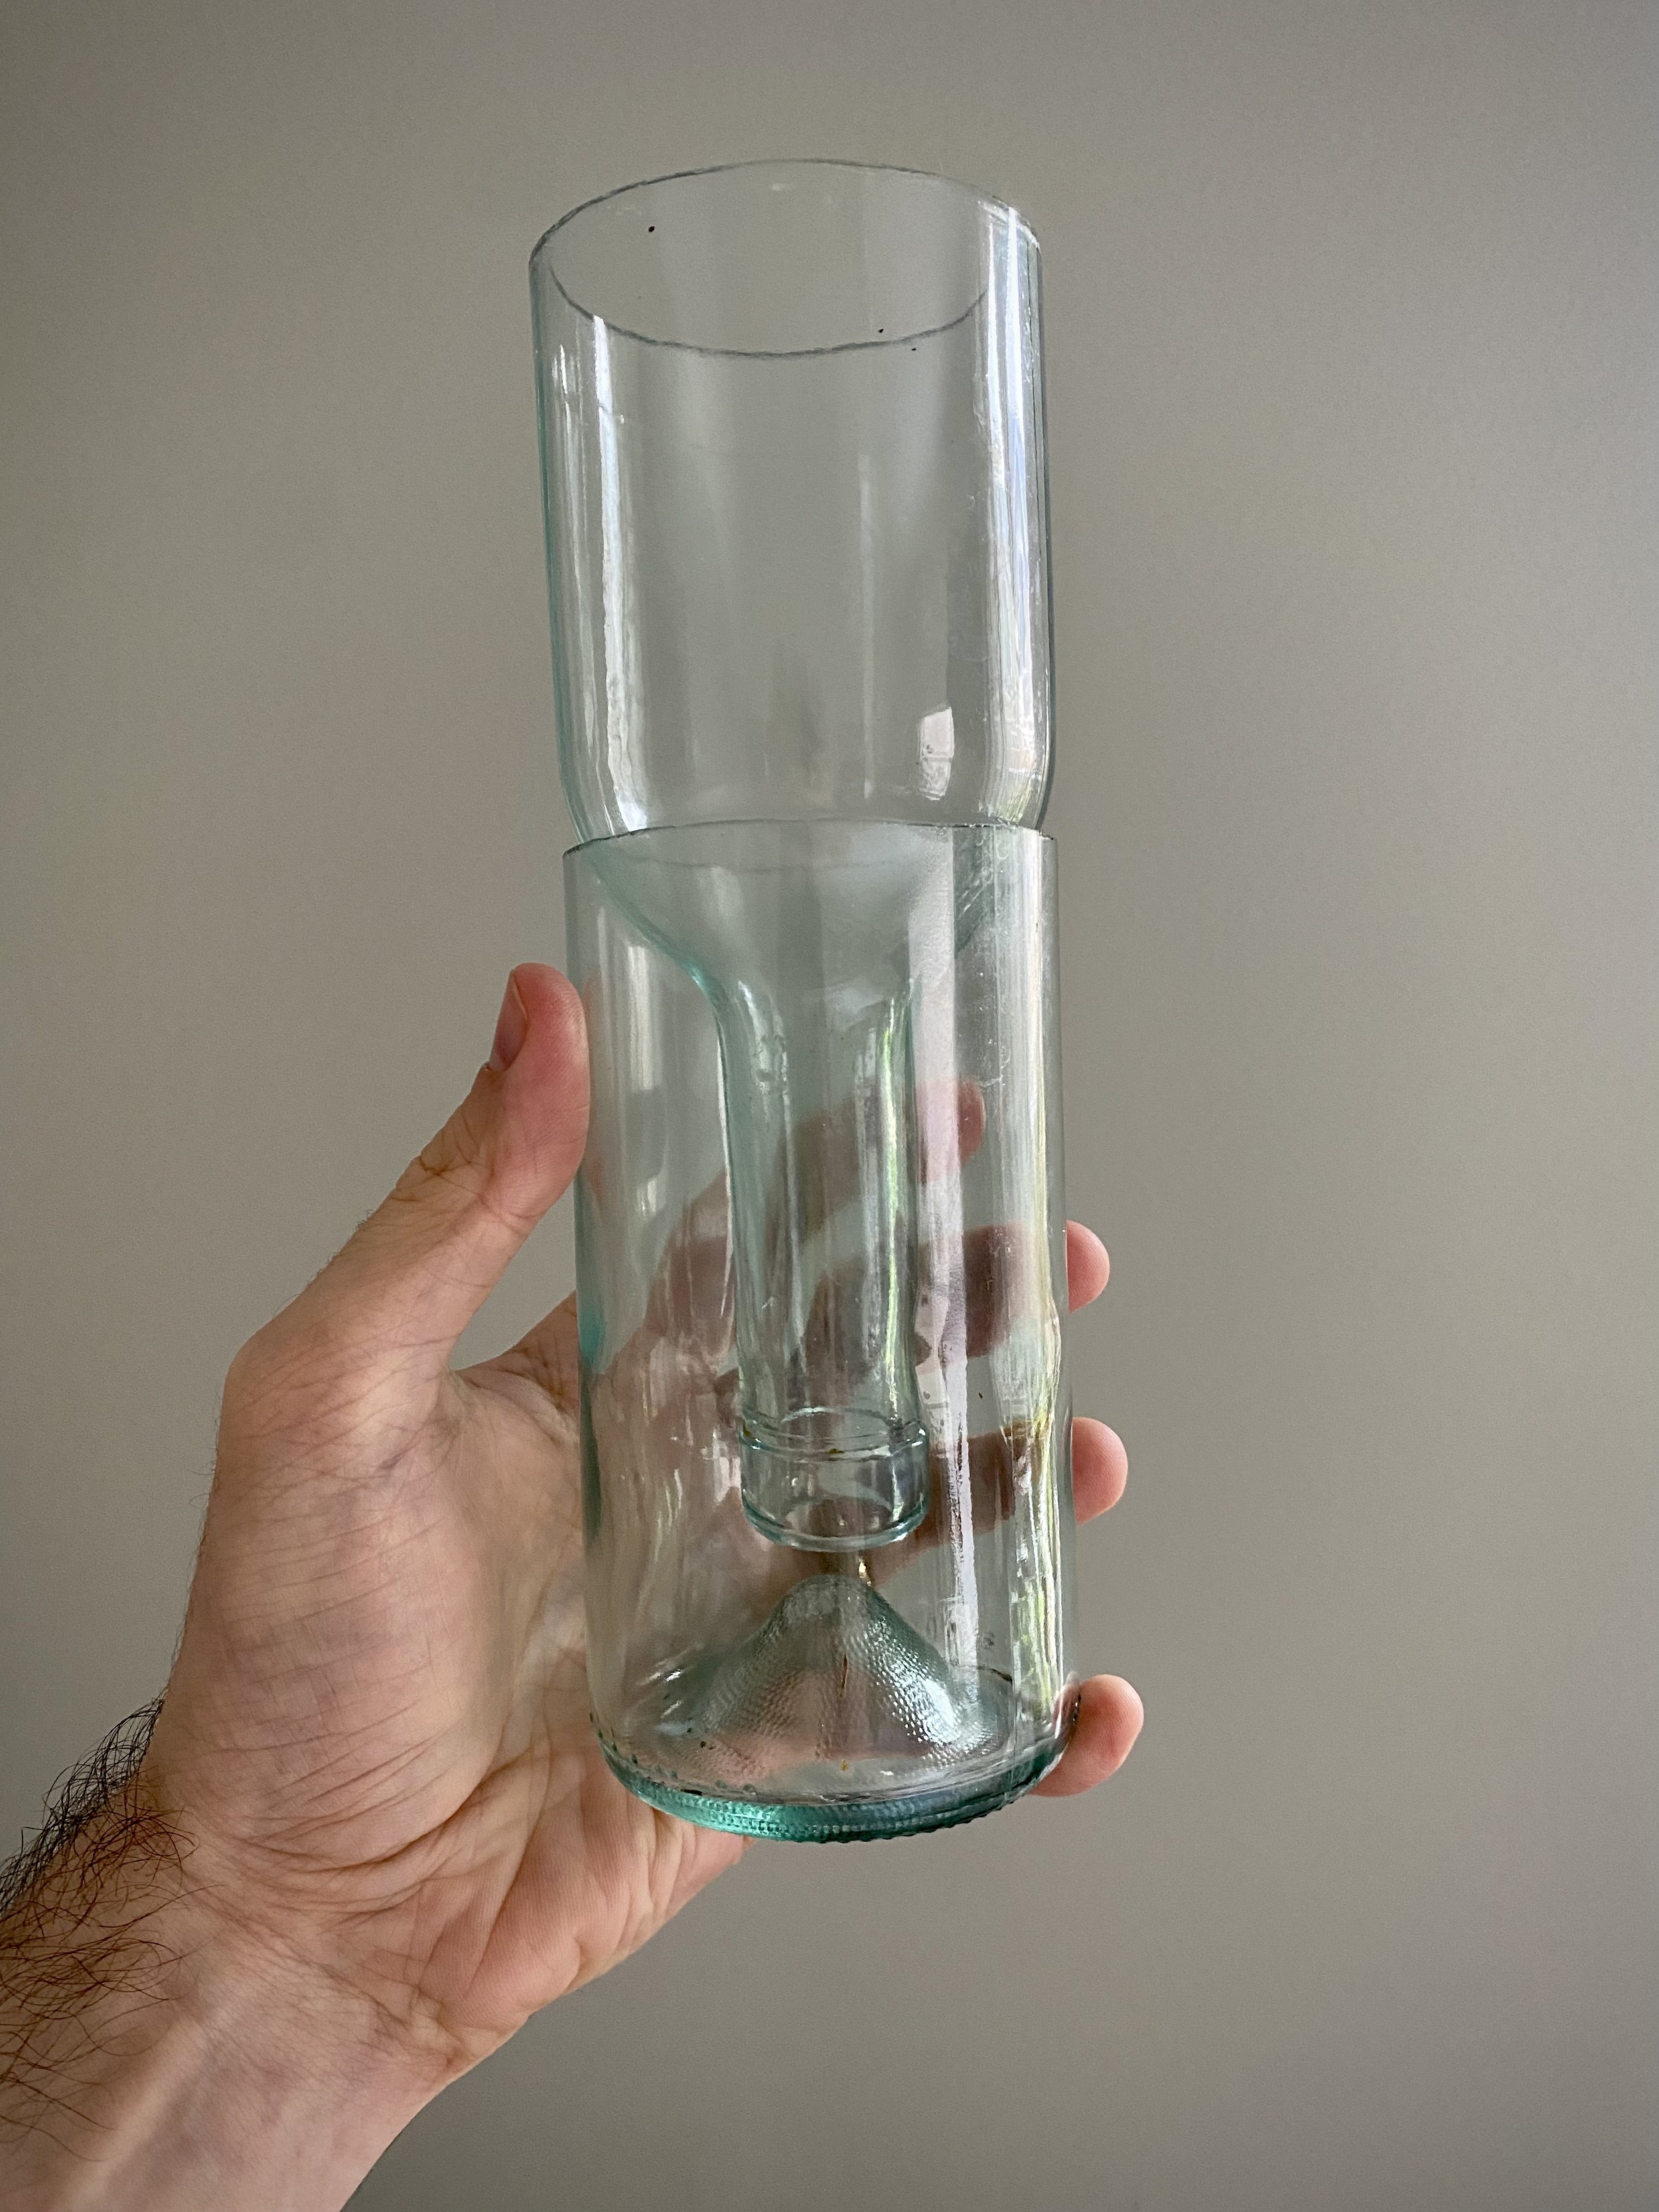
Set the position of your glass cutter to score a line where you want to cut your bottle. To determine the placement, estimate how much of the bottle neck will hang into the bottom half of the bottle once you invert the upper planter portion into the lower reservoir portion. Measure this length, which will be slightly longer than the bottle neck, and set the cutter so that you are scoring your line high enough on the side of the bottle for the bottleneck to not touch the bottom of the bottle in the end - for bottles with deep punts, the reservoir will need to be deeper to account for this.
Step 3. Score the break point to cut the glass
In a smooth, continuous motion, apply even pressure to the bottle as your rotate it on the cutter to score your breakpoint. Only do one pass, but make sure the scored line is complete.
Step 4. Heat the bottle along the score
Gently heat the scored line with your kitchen torch or over a candle. It doesn’t have to be very hot, and I find it works best if I can still safely touch the heated glass.
Step 5. Rinse under cool water for a controlled break
Run the heated bottle under cool water. The thermal shock will cause a crack to form along the scored line. Inspect to see if the crack is complete, along the entire scored line - if it is, the bottle may pop in half on its own, or can be coaxed to do so with a gentle but firm knock against a hard surface. If the crack has not completely gone around the whole bottle, repeat the heating and cooling process until the crack is complete.
This is the step with the most risk, and where I have a 50% success rate. As I said earlier, not all bottles seem to cut easily, and you may find that the crack deviates from the scored line. If this is the case, don’t worry, just move on to the next bottle. It took me a little while to get the knack of the process, and while I’m not a glass-working expert by any means, I suspect that differences in bottle manufacturing or glass types plays a role in your success. My tip is to look for bottles with thicker glass.
Step 6. Sand sharp edges
Use sandpaper to smooth the sharp cut edges. Be careful to avoid cutting yourself, and make sure that you are thorough in smoothing the inner and outer edges of both bottle halves. I start by setting the sandpaper on a flat surface and rub the cut edge against it in a circular motion, and then angle the bottle slightly to round the outer edge a little, and finally, carefully sand the inner edge by folding a piece of sandpaper that I can hold in one hand and rotate the bottle against with the other. Once all sharp edges are gone, you can do a final pass where you fold that sandpaper over the front and back edge together, and sand down the whole rim until you’re happy with the surface.
Step 7. Wash the bottle halves
Give the bottle halves a final wash, and you’re ready to get planting!
Step 8. Install the wicking cord
This is what makes these bottle planters self-watering. There are a couple approaches you can take, but in either case, you are cutting a length of cord, doubling it over into a loop, tying a knot near the middle, and then feeding the loose ends down the neck of the bottle from the inside to hang all the way into the bottom of the reservoir, with the knot sitting at the base of the planter where the neck begins, with the loop sticking up into the medium to draw moisture into it through capillary action.
To keep the cord and substrate in place, you have a couple options.
The first is to tie a single knot in the cord, cut a circle of coconut fiber sheet slightly wider than the bottle diameter, poke a hole through the center, and then feed the loose ends of the cord through that hole. Feed the loose cord ends down the neck of the bottle, and position the coconut fiber circle in the bottom of the planter to act as a screen to keep the substrate in place, with the loop sticking up into the planter.
The second is to put the loop through the knot several times before you tighten it to form a knot large enough to not slip down the bottle neck. You will need a little more cord for this, and will then want to put a small amount of sphagnum moss in the bottom of the planter around the knot, which will also serve as a screen to keep the substrate in place. Again, you want the loop long enough to stick up into the planter.
Step 9. Add some substrate
Since this is a fairly small planter, I like to use a spoon for this. Add a base layer of your substrate to the planter, making sure that the cord loop isn’t visible from the outside of the bottle. This base layer should be deep enough for you to sit the root ball of the plant in top of it, with the crown of the plant just about at the level of the glass rim.
Step 10. Add a plant
Position your plant in the planter, with the remaining portion of the cord loop right below the root ball. Use the spoon to backfill substrate around the plant, using the spoon handle to help tamp the substrate down loosely around the root ball, just as you’d do in a pot. Don’t pack the substrate down firmly, but avoid air pockets. When the plant is stable and securely planted, give it a light watering, rinse the outside of the glass to clean it off, and fill the water reservoir! The maximum water level should be just below the substrate, and when the reservoir runs dry, just add more fresh water. Set your plant in appropriate growing conditions, and let it establish and acclimate.
To wrap up, I want to share a couple thoughts and observations I’ve made using these planters for several years:
I refill the reservoir with fresh water as it empties, and wash it out as algae builds up. When I fertilize, I apply dilute doses directly into the substrate, rather than the reservoir.
Some plants like a little bit of drying, so don’t be afraid to let the reservoir dry for short periods occasionally for those plants. Since the moisture level is going to remain pretty consistent, you can be thoughtful about this, while also trusting that your plants aren’t going to need such consistent attention to stay happy, compared to the same plant in a small pot! If you do let the substrate dry fully, when you refill the reservoir, you may also want to water directly into the substrate as well, just to help it begin to absorb moisture faster.
You can use two bottles to make one planter - this allows you to have a deeper upper half for maximum space for the plant’s roots, as well as an adequately deep reservoir. Just make sure that the shape and size of the bottles themselves work well together.
I like using clear glass so I can easily see the water level and enjoy the visible roots, but colored glass would work too - this might be a good approach to take if you’d prefer less algae growth, or at least to not have the algae be as visible if it does show up.
Be careful working with glass, and use appropriate protective wear to prevent injury!
Links to the products mentioned are provided for convenience, in case you are curious to see what we use ourselves! If you decide to make a purchase, Plant Daddy Podcast earns small commissions on some purchases through the links above. We use these revenues to keep the podcast going and the plant geekery coming. :) Thank you for your support!